There are many ways of making mountains and rock formations. The process is slightly different depending on what kind of rocks you are trying to recreate on your railroad. Is it naturally formed as you find in the nature or is it scattered like when you want to draw a railroad track and need to level out the ground? These two kind of rock formations looks very different from each other and will also require different painting technics. The naturally formed rock will have moss, lava and is more smooth, compared to scattered rock that may contain rust, water, sharp edges and so on and usually have its “lines” in a more up-down direction. There is also a very big variation depending on were in the world you live. Here in Sweden, it looks very different compared to for example the Rocky Mountains. That is also something you have to take into consideration.
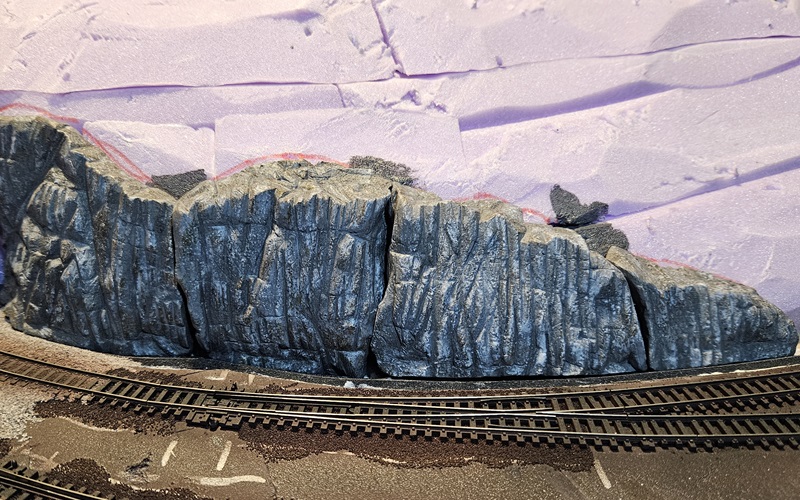
The descriptions and pictures on this page is from me trying to create a rock formation that exists as a wall close to a tunnel entrance. I wanted to shape it as a more shattered version of the rock, so many sharp edges on these ones. I have also less very light and very dark small dots that looks like lava and moss. On the other hand, I added umber mixed with grey to get the effect of red granit mixed into the rock.

I make all my rocks from clay. The kind of clay that will dry in normal air and does not require heat or an oven. The one I use is called DAS and exists in different versions. The one I used is white, but that’s because I have around 10kg of that clay sitting here at home. If I would have bought new clay, I would have gotten the grey version as that is close to the starting color anyway.

Pull out a bit clay and start to form it with your hands so it roughly fits the area you like to have. Once the size is close to what you want, start to form it were you want it. For me, this was close to the tunnel portal. At this stage, you only want to cover the area. Use your fingers and make a very rough fit of the clay

Once the area is filled with clay, take a scraper, a bit wood, a metal rod or what else you can find around and start to form the clay into the rock you aim to. This is a very important step as this is where you form the entire rock. You will work on the fine details later, but the general form of the rock is created here. So if you want natural rock, make it more round with less sharp edges. If you want the scattered one, sharp edges and up-down oriented lines is required.
Once the area is filled with clay, take a scraper, a bit wood, a metal rod or what else you can find around and start to form the clay into the rock you aim to. This is a very important step as this is where you form the entire rock. You will work on the fine details later, but the general form of the rock is created here. So if you want natural rock, make it more round with less sharp edges. If you want the scattered one, sharp edges and up-down oriented lines is required.

Now comes the time-consuming part. Take a knife and start to cut up the rock. There are some adjustments you can do here if you’re not 100% happy with how the rock turned out from the rough-forming part. I prefer to use a knife where the blade is 90 degrees from the handle. Makes it easier to access the deep small cuts without the need to bend the blade.
When the rock cut into the shape you want, you need to add crack lines. I use the same knife for that, but I don’t cut with the edge as I want to actually cut anything, but I hold it turned 90 degrees. So I rather make a scratch instead of a cut. Do this all over the rock, in all different directions. Just go crazy at this stage and scratch the entire rock. There shouldn’t be any large parts that doesn’t have a scratch on it

The scratching and cutting part usually leave small waste left on the rock. I clean it up with a nylon brush that I work over the entire part. Blow all the dust of and you are ready to start with the painting.

Start with a light grey color and just paint it all. Make sure the paint is dry before continuing to the next part. This is the part where you might save some painting if you can find light grey clay instead of the white version I’m using. But I haven’t really tried that myself as I only have white clay.

Now you need to put a black wash on the entire rock. This will make it a lot darker and all steps after this will make it lighter again. The wash is black color or very dark grey mixed up with a LOT of water. It should really feel more like water then paint. The thought about this is that the paint will stick in all the cracks and keep them dark, and at the same time leave the light cray color on the high parts.
PS. Use plastic gloves….

Now comes the “dotting” work. This will be a lot different depending on what kind of rocks you are creating. On my rocks, I used a light cray, grey mixed with umber, grey mixed with dark green and a very dark, close to black color. Keep in mind that they should always be mixed with water. When you have the color you want, use a sponge and put a very limited amount of pain/wash on it and then very gently touch the rock with it. It should give a limited amount of colors on the rock.

This is what my rocks looks like after adding 4-6 different colors to it. I let the paint/wash dry between each operation.
Finished result